Backing up your iPhone to a Mac is a crucial step in ensuring your data's safety and accessibility. With the increasing reliance on smartphones for storing valuable information, creating a backup allows you to safeguard your contacts, photos, apps, and settings. Moreover, it enables a seamless transition to a new device or recovery from unexpected data loss. This guide will walk you through the detailed process of backing up your iPhone to a Mac, emphasizing both manual and automated strategies.
As technology evolves, so do the methods for protecting our digital lives. The integration between Apple devices makes the process of backing up your iPhone to a Mac not only possible but also efficient. It’s essential to understand the built-in tools and options available for backup, such as Finder and iCloud, and how they can be tailored to fit your personal preferences. This comprehensive guide aims to simplify the process, making it accessible to users of all levels.
In today's fast-paced world, data loss can be a significant setback. Whether due to hardware failure, accidental deletion, or software issues, losing your data can be frustrating and time-consuming to recover. By following the steps outlined in this guide, you'll be well-equipped to protect your iPhone's data and ensure it remains intact and easily recoverable. Let's dive into the practical methods of how you can efficiently backup your iPhone to a Mac.
Read also:Asap Rocky Zodiac The Stars Astrological Influence And More
| Table of Contents |
|---|
| 1. Understanding the Importance of Backing Up |
| 2. How Does a Backup Work? |
| 3. Preparing Your iPhone and Mac for Backup |
| 4. How Do You Backup iPhone to Mac Using Finder? |
| 5. Utilizing iCloud for Backup |
| 6. Manual vs. Automatic Backup: What's Best? |
| 7. Common Backup Issues and How to Solve Them |
| 8. Ensuring Successful Backup Transfers |
| 9. How to Restore Your iPhone from a Mac Backup? |
| 10. Security Measures for Backup |
| 11. How Often Should You Backup Your iPhone? |
| 12. Backup Options for Different iPhone Models |
| 13. What to Do if Your Backup Fails? |
| 14. Exploring Third-Party Backup Tools |
| 15. The Future of iPhone Backup Technologies |
| 16. FAQs |
| 17. Conclusion |
1. Understanding the Importance of Backing Up
Backing up your iPhone is not just a recommended practice; it’s a necessity. The importance of data backup cannot be overstated, especially in a digital age where our smartphones store everything from cherished memories to critical business information. By regularly backing up your iPhone, you ensure that your data is protected against unexpected loss, whether due to physical damage, theft, or software malfunctions.
Regular backups also provide peace of mind, allowing you to restore your data to a new device without hassle. This is particularly beneficial when upgrading to a new iPhone model. Additionally, backups can help you recover from accidental deletions and provide a record of your phone’s data at a specific point in time.
Understanding the need for a backup is the first step in protecting your digital life. Whether you choose iCloud, Finder, or another method, the goal is to ensure that your data is safe, secure, and easily recoverable whenever needed.
2. How Does a Backup Work?
A backup is essentially a copy of your device's data stored in a different location. When you back up your iPhone to a Mac, you're creating a replica of your phone’s contents, which can be restored later if needed. This includes your photos, messages, app data, and settings. The process involves transferring data from your iPhone to your Mac through a physical connection or over the internet.
There are two primary methods for backing up an iPhone: using Finder on macOS Catalina and later, and using iCloud. Finder creates a local backup stored on your Mac, while iCloud stores the backup on Apple’s servers. Each method has its advantages, and the choice often depends on personal preference and available resources.
Understanding how backups work helps you make informed decisions about which method to use and how often to perform backups. By knowing what data is backed up and how it is stored, you can ensure that your backup strategy meets your needs and provides adequate protection for your digital information.
Read also:Ultimate Guide To The Best Wedding Cake Cutting Songs
3. Preparing Your iPhone and Mac for Backup
Before you begin the backup process, it’s essential to prepare both your iPhone and Mac to ensure a smooth and successful operation. The first step is to ensure that your devices are fully charged or connected to a power source. This prevents any interruptions due to low battery during the backup process.
Next, make sure your Mac is running the latest version of macOS. Software updates often include important fixes and new features that can improve the backup process. Similarly, ensure your iPhone is updated to the latest iOS version to maximize compatibility and performance.
Once your devices are ready, check your Mac's available storage space. Backups can take up a significant amount of space, so it's crucial to have enough free storage on your Mac to accommodate the backup files. If necessary, clear out unneeded files or use an external storage device to free up space.
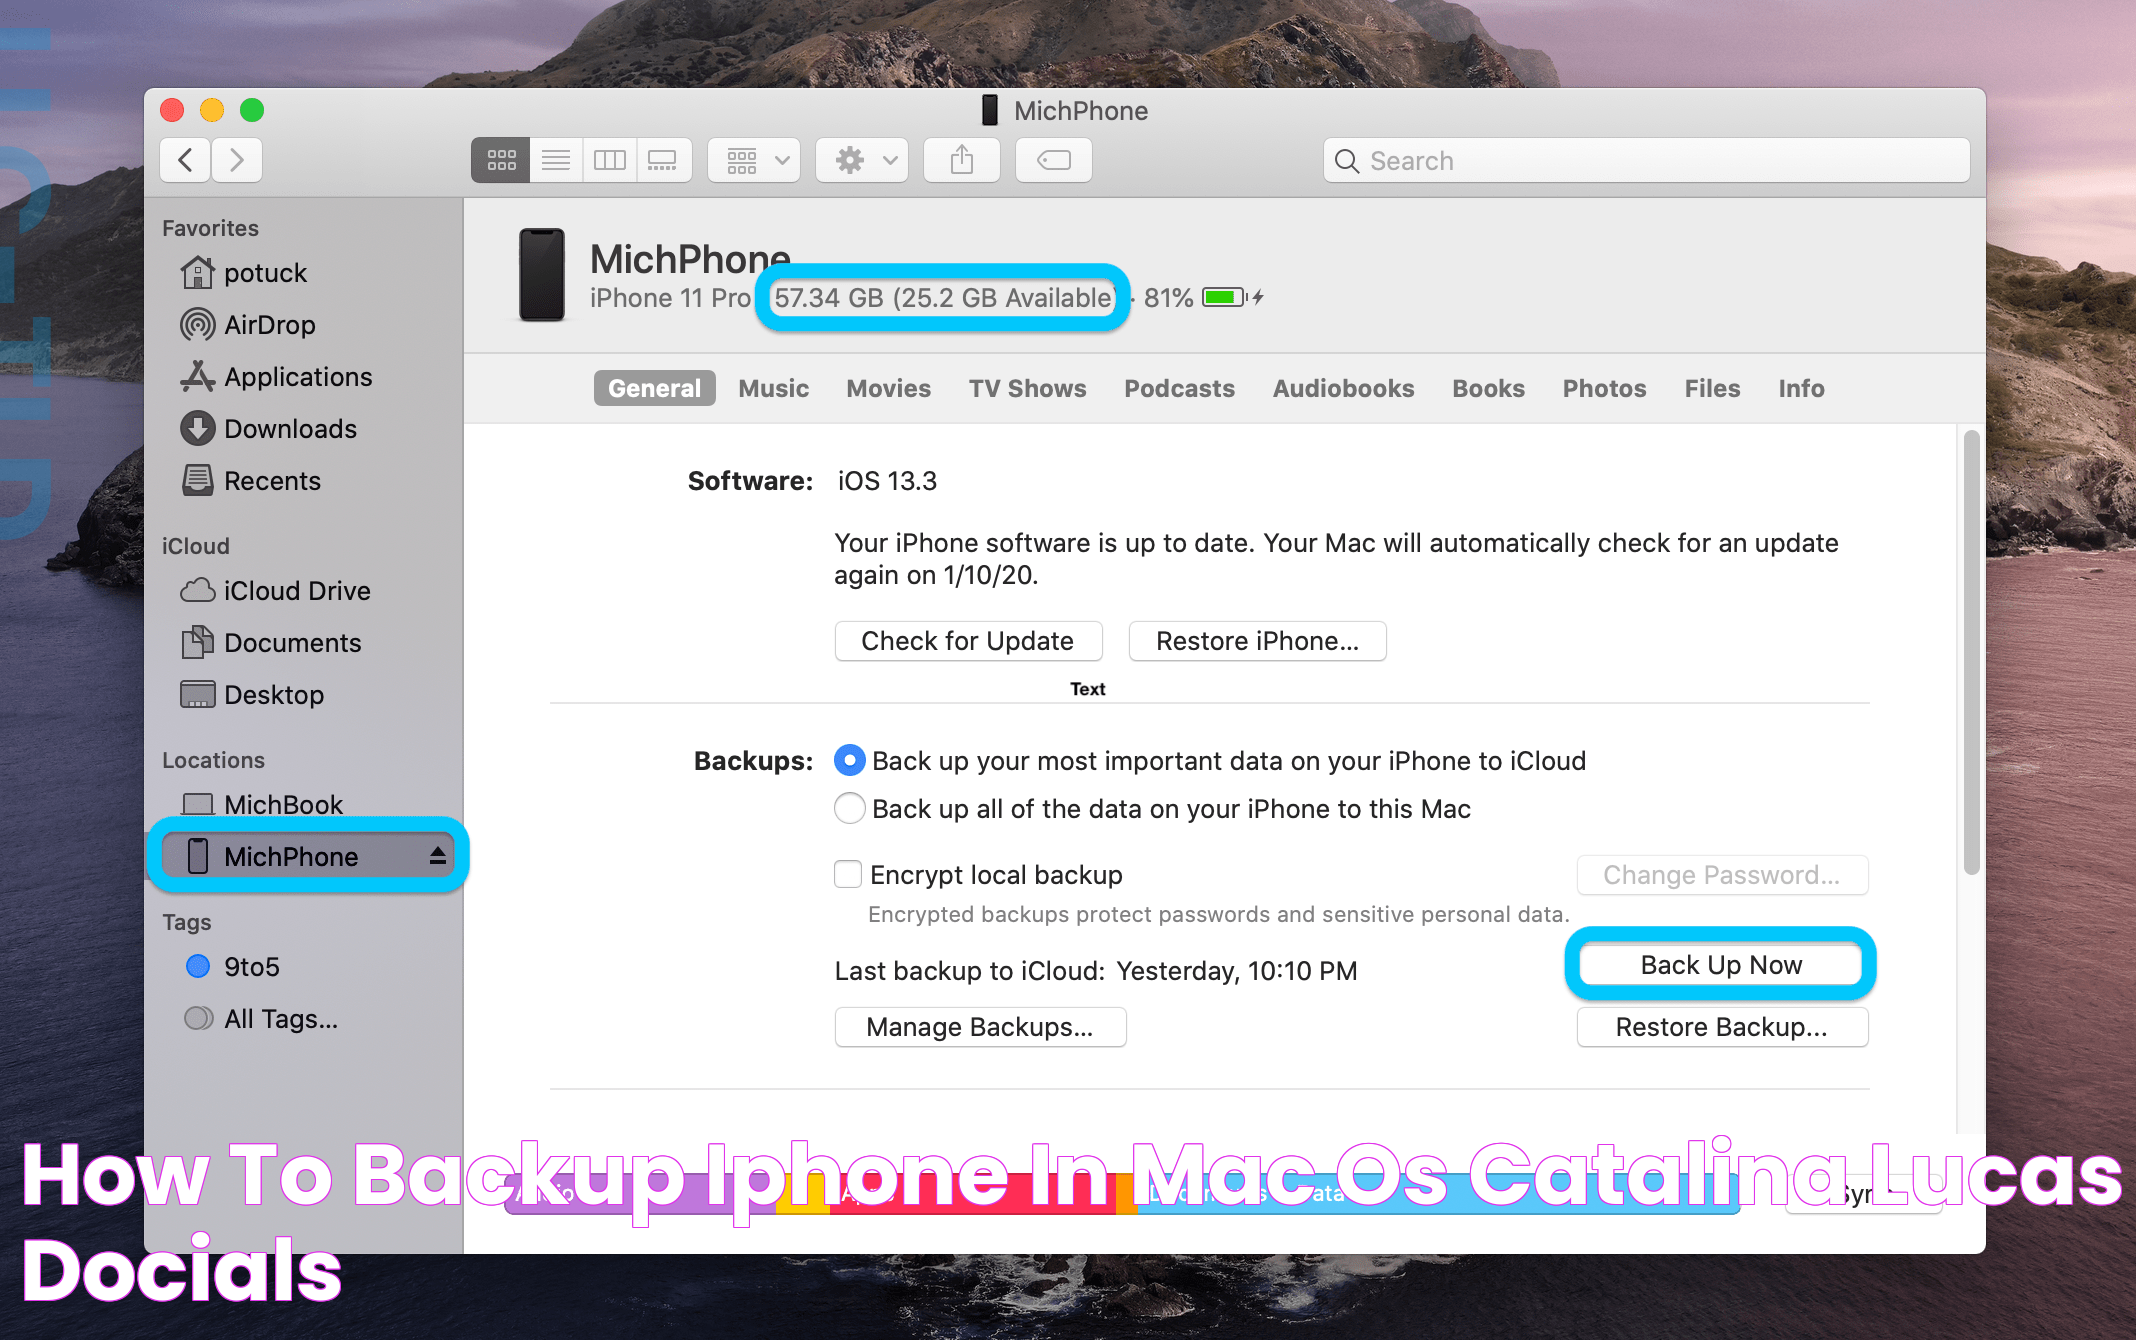
4. How Do You Backup iPhone to Mac Using Finder?
Backing up your iPhone to a Mac using Finder is a straightforward process, and it’s the preferred method for users on macOS Catalina and later. Here’s how to do it:
- Connect your iPhone to your Mac using a USB or USB-C cable.
- Open Finder on your Mac. Your iPhone should appear in the sidebar under “Locations.”
- Select your iPhone. You may need to trust the device on both your iPhone and Mac if prompted.
- Once your iPhone is recognized, you’ll see a summary page with various options. Look for the “Backups” section.
- Select “Back up all of the data on your iPhone to this Mac.”
- If you want to encrypt your backup to include health and activity data, check the box for “Encrypt local backup” and create a password.
- Click “Back Up Now” to start the backup process.
Finder will begin backing up your iPhone, creating a local copy of your data on your Mac. The time it takes will depend on the amount of data being backed up and the speed of your connection. Once complete, you’ll have a secure backup of your iPhone stored on your Mac, ready for restoration whenever needed.
5. Utilizing iCloud for Backup
iCloud offers a convenient way to back up your iPhone without requiring a physical connection to a Mac. With iCloud, your data is stored on Apple’s servers, allowing you to access it from any device with your Apple ID. Here’s how to use iCloud for backup:
- Ensure your iPhone is connected to Wi-Fi.
- Go to “Settings” on your iPhone, then tap your name at the top.
- Select “iCloud,” then tap “iCloud Backup.”
- Toggle on “iCloud Backup” if it isn’t already enabled.
- Tap “Back Up Now” to start the backup process.
iCloud will begin uploading your iPhone’s data to Apple’s servers. This includes your app data, device settings, photos, and more. Automatic backups will occur when your iPhone is connected to Wi-Fi, plugged in, and locked. iCloud provides 5GB of free storage, with additional storage available for purchase if needed.
Using iCloud for backup is ideal for users who prefer a wireless solution and want to ensure their data is accessible from anywhere. It’s also a great option for those who may not have immediate access to a Mac but want to maintain regular backups of their iPhone.
6. Manual vs. Automatic Backup: What's Best?
When it comes to backing up your iPhone, you have the option of choosing between manual and automatic backups. Each method has its pros and cons, and the best choice often depends on your lifestyle and needs.
Manual backups, as the name suggests, require you to initiate the backup process yourself. This can be done using Finder or iCloud, and it gives you complete control over when and how often backups are performed. Manual backups are ideal for users who want to ensure their backups are done at specific times or who prefer not to rely on automatic processes.
Automatic backups, on the other hand, occur without user intervention. With iCloud, automatic backups happen when your iPhone is connected to Wi-Fi, plugged in, and locked. This ensures that your data is consistently backed up without requiring you to remember to do it manually. Automatic backups are convenient and provide peace of mind, especially for those who may forget to perform regular backups.
Ultimately, the best backup method is the one that aligns with your preferences and ensures your data is consistently protected. Many users find that a combination of both methods offers the most comprehensive coverage, using automatic backups for regular protection and manual backups for specific needs or before significant changes.
7. Common Backup Issues and How to Solve Them
While backing up your iPhone is generally a smooth process, you may encounter some common issues along the way. Here are a few potential problems and their solutions:
- Backup Taking Too Long: If your backup is taking longer than expected, check your internet connection or try connecting to a different network. For Finder backups, ensure your cable is in good condition and consider using a USB 3.0 port for faster data transfer.
- Insufficient Storage: Whether using iCloud or Finder, running out of storage can halt the backup process. Free up space by deleting unnecessary files or consider upgrading your iCloud storage plan.
- Backup Fails to Complete: Restart your devices and try again. If the issue persists, ensure your iOS and macOS are updated to the latest versions.
- Cannot Locate Backup: For Finder backups, check the backup location under Finder preferences. For iCloud, log in to iCloud.com to verify your backups.
Addressing these issues promptly ensures your backups are successful and your data remains protected. If problems persist, reaching out to Apple Support or visiting an Apple Store can provide additional assistance.
8. Ensuring Successful Backup Transfers
Once your iPhone is backed up to your Mac or iCloud, it’s essential to ensure the transfer was successful. For Finder backups, you can verify the backup by navigating to Finder preferences and checking the list of backups. Ensure the timestamp matches the most recent backup attempt.
For iCloud backups, you can check the backup status by going to “Settings” on your iPhone, selecting your name, and then “iCloud.” Tap “iCloud Backup” to see the date and time of the last successful backup.
If you’re upgrading to a new iPhone or restoring from a backup, testing the backup by temporarily restoring it to the current device can provide peace of mind. This step verifies that your backup file is intact and ready for use.
9. How to Restore Your iPhone from a Mac Backup?
Restoring your iPhone from a Mac backup is a straightforward process, allowing you to recover your data quickly. Here’s how to do it using Finder:
- Connect your iPhone to your Mac using a USB or USB-C cable.
- Open Finder and select your iPhone from the sidebar.
- In the “General” tab, click “Restore Backup.”
- Select the backup you wish to restore from the list provided.
- If the backup is encrypted, enter the password to unlock it.
- Click “Restore” and wait for the process to complete.
Your iPhone will restart once the restoration is complete, with all your data and settings restored to the state of the selected backup. It’s important to keep your iPhone connected throughout the process to prevent any interruptions.
10. Security Measures for Backup
Security is paramount when it comes to backing up your iPhone. To ensure your data remains protected, consider the following measures:
- Encrypt Local Backups: When using Finder, encrypt your backup to protect sensitive data, including health and activity information.
- Use Strong Passwords: If encrypting your backup, choose a strong password and store it securely. Without it, you won’t be able to restore the backup.
- Enable Two-Factor Authentication: For iCloud backups, enable two-factor authentication for your Apple ID to add an extra layer of security.
- Regularly Update Software: Keeping your iOS and macOS updated ensures you have the latest security patches and features.
By implementing these security measures, you can safeguard your backups against unauthorized access and ensure your data remains confidential and protected.
11. How Often Should You Backup Your iPhone?
The frequency of backups depends on your usage and how frequently your data changes. For most users, a weekly backup is sufficient to ensure data is up to date and protected. However, if you frequently add or change data, consider backing up more often, such as daily or every few days.
Automatic iCloud backups provide a convenient solution for regular backups without needing to remember to do it manually. If using Finder, set a reminder to perform backups at regular intervals, especially before making significant changes to your iPhone, such as updating iOS or installing major app updates.
12. Backup Options for Different iPhone Models
While the process of backing up an iPhone is generally consistent across models, there may be slight variations in available options and compatibility. For example, older iPhone models may not support all the latest iOS features, which could impact certain backup functionalities.
Regardless of the model, using Finder or iCloud remains the most reliable methods for backing up. Always ensure your devices are updated to the latest available software to maximize compatibility and feature access.
13. What to Do if Your Backup Fails?
If your backup fails, don’t panic. Begin by checking your internet connection for iCloud backups or your cable and port for Finder backups. Restart your devices and ensure they’re updated to the latest software versions. If the issue persists, try a different network or cable, or consider freeing up storage space if insufficient storage is causing the failure.
For persistent issues, consulting Apple Support or visiting an Apple Store can provide additional guidance and solutions to resolve backup problems.
14. Exploring Third-Party Backup Tools
While Apple’s built-in tools are sufficient for most users, third-party backup solutions can offer additional features and flexibility. These tools often provide cross-platform compatibility, additional encryption options, and advanced scheduling and automation capabilities.
Before choosing a third-party tool, ensure it is reputable and compatible with your devices. Reading reviews and consulting trusted sources can help you select a reliable solution that meets your backup needs and enhances your data protection strategy.
15. The Future of iPhone Backup Technologies
As technology continues to evolve, so does the landscape of iPhone backup solutions. Future advancements may include faster and more efficient backup processes, increased storage options, and enhanced security measures. The integration of AI and machine learning could automate and optimize backup processes, ensuring data is always protected with minimal user intervention.
Staying informed about these developments can help you adapt to new technologies and optimize your backup strategy to meet future needs and challenges.
16. FAQs
1. Can I backup my iPhone without a Mac?
Yes, you can use iCloud to backup your iPhone without a Mac. This method stores your data on Apple's servers, allowing you to access it from any device with your Apple ID.
2. What happens if I lose my backup password?
If you lose your backup password, you won't be able to restore encrypted backups. It's crucial to store your password securely and consider using a password manager for safe keeping.
3. How do I check if my iCloud backup is successful?
Go to "Settings" on your iPhone, select your name, then "iCloud." Tap "iCloud Backup" to see the date and time of the last successful backup.
4. Can I use both Finder and iCloud for backups?
Yes, you can use both methods to create multiple backups, providing additional security and flexibility in data recovery.
5. How do I free up iCloud storage for backups?
Delete unnecessary files or purchase additional storage through your iCloud settings. You can also manage storage by selecting which apps and data to include in your backup.
6. Is it safe to use third-party backup tools?
While many third-party tools are safe and reliable, ensure you choose ones that are reputable and compatible with your devices. Research and reviews can guide your decision.
17. Conclusion
Backing up your iPhone to a Mac is a vital process that ensures your data remains secure and accessible. Whether you choose Finder, iCloud, or a combination of methods, understanding the backup process and implementing the right strategies will protect your digital life from unexpected data loss. By following this guide, you’re well-equipped to master the art of iPhone backups, providing peace of mind and data security for your essential information.